Merlin Mystery Solution: Part 7

The Merlin Mystery prize wand
Go to the Merlin Mystery Solution Index.
This is Part 7 of my solution to The Merlin Mystery (“MM”) by Jonathan Gunson and Marten Coombe.
This post provides the complete solution to the Sphere mini-puzzle.
In part 3, we established the chain of objects that links the Sphere to the Cadency symbols. Specifically, the Sphere links to a book with a gold Cadency symbol on the left page and silver Cadency symbol on the right page. This book is shown most clearly on P6,S42
Understanding Cadency
It is not necessary to know anything about Cadency to solve this puzzle, although it helps spot a key difference between the Sphere mini-puzzle and the almost identical Cube mini-puzzle.
The 9 different Cadency symbols are used, in the real world, on coats of arms to distinguish sons/daughters by order of their birth. The first born would use the first symbol, the second born the next and so on.
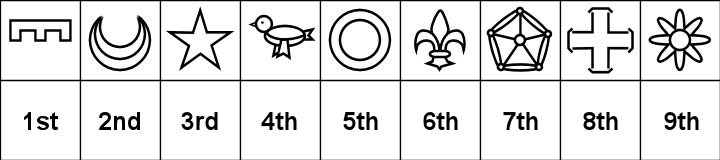
Cadency symbols in order
MM indicates the correct order of Cadency symbols by showing them in sequence in books of coats of arms that appear in the border squares. The book featuring C1 appears on P4 (in S45). The next book is on P14 and features the C2 symbol. C3 appears on P22, and so on.
As with the Cube mini-puzzle, the Sphere puzzle tells you to turn pages left and right in the book depending on the number of gold and silver Cadency symbols. The difference is that each Cadency symbol has a different value between 1 and 9. A gold C3 mean turn 3 pages to the left. A silver C6 means turn 6 pages to the right, and so on.
Counting Cadency Symbols
The table below lists all of the gold and silver Cadency symbols that appear on each page. As with the other symbols so far, there are no cadency symbols on P2 or P44. All the other pages have at least 1. Fortunately there are not too many, but some of them are well hidden.
As shown in the book on P6, S42 gold symbols mean “turn left”, silver symbols mean “turn right”. The last row of the table sums the values of all the different symbols on each page to give the final number of pages to turn left (negative numbers) or turn right (positive numbers) in the book.
| Page | 4 | 6 | 8 | 10 | 12 | 14 | 16 | 18 | 20 | 22 | 24 | 26 | 28 | 30 | 32 | 34 | 36 | 38 | 40 | 42 |
| Gold Cs | 4 | 8 | 6 | 7 | 4,6 | 4,6 | – | 6 | 8 | 2 | 7 | 2,4,8 | – | 5,6 | 1,2 | 4 | 8 | 7,8 | 4 | 1,4 |
| Silver Cs | 1,2 | 2,5 | 1,4 | 1,2,6 | 8 | 8 | 1,5 | 5 | 1,2,5,6 | 6 | 4 | 1,6 | 6 | 2,4 | 5 | 6 | 7 | 2,5 | 5 | 6 |
| Sum | -1 | -1 | -1 | +2 | -2 | -2 | +6 | -1 | +6 | +4 | -3 | -7 | +6 | -5 | +2 | +2 | -1 | -8 | +1 | +1 |
This looks random, but we can only see if it works by putting it together with page turns we made during the Cube step.
Putting the Pieces Together
The table below shows the outcome of the two different page turns required by the puzzle. Counting Mers (Cube puzzle) on a 1st page tells us to turn to a 2nd page. Then, counting Cadency symbols (Sphere puzzle) on that 2nd page moves us to a 3rd page.
| 1st page | 4 | 6 | 8 | 10 | 12 | 14 | 16 | 18 | 20 | 22 | 24 | 26 | 28 | 30 | 32 | 34 | 36 | 38 | 40 | 42 |
| Mer sum | 0 | +2 | -1 | -1 | +9 | +5 | +8 | +4 | +7 | -1 | -3 | -6 | -3 | -9 | -8 | -3 | +1 | +1 | -2 | 0 |
| 2nd page | 4 | 10 | 6 | 8 | 30 | 24 | 32 | 26 | 34 | 20 | 18 | 14 | 22 | 12 | 16 | 28 | 38 | 40 | 36 | 42 |
| C sum | -1 | +2 | -1 | -1 | -5 | -3 | +2 | -7 | +2 | +6 | -1 | -2 | +4 | -2 | +6 | +6 | -8 | +1 | -1 | +1 |
| 3rd page | 2 | 14 | 4 | 6 | 20 | 18 | 36 | 12 | 38 | 32 | 16 | 10 | 30 | 8 | 28 | 40 | 22 | 42 | 34 | 44 |
There are three important things to notice. Most importantly, no page appears more than once in the final list. This confirms that we’ve got everything right so far.
Another result is that P2 and P44 have finally been brought into the puzzle. P4 turns one page back to P2 and P42 turns one page forward to P44. The symmetry of this again acts as a confirmer.
The final thing of note is that P24 and P26 do not appear in the final page list. The reason for this is revealed when solving the Cuboid puzzle. As a hint, take a look at the copper tiles on every page. There is something different about the tiles on P24 and P26.
End of Part 7
To re-cap, the Pyramid puzzle gave us a sequence of Zodiac starting squares on each page. The Cone and Cube puzzles take us to a 2nd page and give us a sequence of alchemy symbols to shoot at from the Zodiac squares. These lines point to a new border square but we’re on the wrong page.
The Sphere puzzle tells us to turn to a 3rd page. The conclusion is that the end squares are on these 3rd pages.
The table below lists the page sequence and the end square that is pointed to for the first 12 Zodiac points. It also describes the contents of those end squares.
| Start Page | 2nd page | End Page | End square | Contents |
| 4 | 4 | 2 | 18 | A copper tile and an alchemy book half in the square |
| 4 | 4 | 2 | 35 | An upturned box |
| 4 | 4 | 2 | 38 | A random splash of quicksilver |
| 6 | 10 | 14 | 32 | A purple Sagittarius symbol |
| 6 | 10 | 14 | 2 | The edge of a lightning bolt and part of a glass sphere |
| 6 | 10 | 14 | 1 | A lightning bolt |
| 6 | 10 | 14 | 42 | One wing of a spitfire |
| 8 | 6 | 4 | 6 | One wing of a spitfire |
| 8 | 6 | 4 | 7 | The front end of a spitfire |
| 8 | 6 | 4 | 26 | A copper tile |
| 8 | 6 | 4 | 10 | A framed sketch of Crataegus monogyna |
| 10 | 8 | 6 | 19 | Part of a lump of blue stone |
This doesn’t look very convincing. Few of the end squares contain definite objects which might spell out the final solution.
Everything so far seems to be working well, so the conclusion is we still haven’t found a final set of solution squares. Let’s move on to the next mini-puzzle, the Cylinder.
As a hint if you want to try to solve it yourself, and as reassurance if you’re already confused as to which page you’re on, the Cylinder puzzle does not tell you to turn to a new page!