Merlin Mystery Solution: Part 5

The Merlin Mystery
Go to the Merlin Mystery Solution Index.
This is Part 5 of my solution to The Merlin Mystery (“MM”) by Jonathan Gunson and Marten Coombe.
This post provides the complete solution to the Cone mini-puzzle.
In part 3, we established the chain of objects that links the Cone to the spitfires and the Merlin symbol (“Mer”). We also saw that there is an ambiguity since the Cube is also linked to Mer.
This part goes through the clues that explain the meaning of the spitfires and how this resolves the ambiguity between the Cone and Cube links to Mer.
Cone Links to Spitfires
Every page except P2 and P44 has a spitfire on it somewhere. They all have varying numbers of red and black diamonds on the wings (editions of the book sold outside Europe use swastikas). This indicates some sort of code or sequence.
Some of the spitfire have 3 propeller blades and some have 4. I’ve tabled the appearance of all of the planes below, along with the number of diamonds that appear on the 3-prop and 4-prop versions.
| Page | 4 | 6 | 8 | 10 | 12 | 14 | 16 | 18 | 20 | 22 | 24 | 26 | 28 | 30 | 32 | 34 | 36 | 38 | 40 | 42 |
| 3-prop | 10 | 6 | 5 | 7 | 2 | 4 | 3 | 1 | ||||||||||||
| 4-prop | 12 | 9 | 4 | 2 | 5 | 6 | 1 | 10 | 7 | 3 | 11 | 8 |
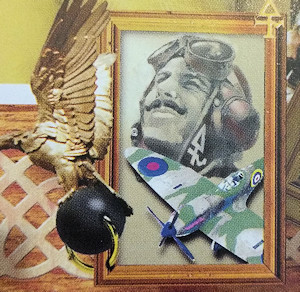
The Merlin Spitfire on P18
Focusing on just the 4-prop planes, there are three things to notice:
- There are 12 of them.
- The numbers from 1 to 12 are appear once in the number of diamonds on their wings.
- The first plane, which has 12 diamonds, also has two large golden Mer symbols on its wings
We know the Mer symbol is the master of alchemy and that there are 12 alchemy symbols. This suggests that the spitfires each represent one of the 12 alchemy symbols. And this resolves the ambiguity between the Cone and Cube puzzles. The Cone links to the 12 alchemy symbols via the master Mer symbol, while the Cube links directly to the gold and silver Mer symbols.
Working out exactly what the spitfires and the number of diamonds mean requires a leap of logic as I have been unable to identify anything which I think gives a clear clue. The idea is that the spitfires provide a special order for the 12 alchemy symbols. On the wand page, P46, the 12 alchemy symbols are shown in a line. The spitfires assign a new order number to each of those symbols in turn.
| Name | Mercury | Aqua Fortis | Copper | Fire | Iron | Air | Tin | Earth | Lead | Water | Sulfur | Salt |
| Wand order (A) | 1 | 2 | 3 | 4 | 5 | 6 | 7 | 8 | 9 | 10 | 11 | 12 |
| Plane order (B) | 12 | 9 | 4 | 2 | 5 | 6 | 1 | 10 | 7 | 3 | 11 | 8 |
Here’s the table with pictures of the alchemy symbols in the top row.

Ordered alchemy symbols
As a reminder, my shorthand for the wand order of the alchemy symbols runs from A1 to A12 for Mercury to Salt. My shorthand for the plane order of the alchemy symbols runs from B1 for Tin to B12 for Mercury.
Armed with this newly ordered list of alchemy symbols, the next step is to figure out how they fit into the larger puzzle.
Cone Links to Alchemy Symbols
Solving the puzzle requires hunting for the 12 alchemy symbols on every page.
There are lots of them etched into the copper tiles around the border. However, we know from Part 3 that the copper tiles are linked to the Cuboid. We’ll ignore them for now just as we ignored the copper Zodiac tiles when solving the Pyramid puzzle in Part 4.
Every page except P2 and P44 has several small gold alchemy symbols scattered across the page, always inside the border. There are also some “fake” alchemy symbols but these are red herrings. The top left of P4, for example, has a symbol that looks like a circle with a vertical line through it and a horizontal line pointing right. This symbol is meaningless.
P4 has only three real alchemy symbols on it: tin (A7), fire (A4), and water (A10). This looks random until you realise that, under the new ordering system given by the spitfires, these three alchemy symbols are B1, B2 and B3. Turning to P6, there are 4 alchemy symbols, B8, B9, B10 and B11.
Going through the whole book, every page has either 3 or 4 gold alchemy symbols in sequence, although the sequence jumps between pages. In total, there are 75 gold alchemy symbols.
Here’s the full list of alchemy symbols on each page, numbered with the “B”, spitfire order.
| Page | 4 | 6 | 8 | 10 | 12 | 14 | 16 | 18 | 20 | 22 | 24 | 26 | 28 | 30 | 32 | 34 | 36 | 38 | 40 | 42 |
| Sym 1 | 1 | 8 | 12 | 4 | 2 | 6 | 6 | 2 | 10 | 10 | 7 | 3 | 10 | 4 | 11 | 7 | 9 | 2 | 6 | 1 |
| Sym 2 | 2 | 9 | 1 | 5 | 3 | 7 | 7 | 3 | 11 | 11 | 8 | 4 | 11 | 5 | 12 | 8 | 10 | 3 | 7 | 2 |
| Sym 3 | 3 | 10 | 2 | 6 | 4 | 8 | 8 | 4 | 12 | 12 | 9 | 5 | 12 | 6 | 1 | 9 | 11 | 4 | 8 | 3 |
| Sym 4 | – | 11 | 3 | 7 | 5 | 9 | 9 | 5 | 1 | 1 | 10 | 6 | 1 | – | 2 | – | 12 | 5 | – | – |
It’s not yet clear what this means, but the pattern suggests we’re on the right track.
Putting Pieces Together
We know from the Pyramid puzzle and the picture on P38 that we’re shooting lines from Nimue’s zodiac squares at Merlin. The Cone is the second solid in the line, which tells us that our lines are being shot towards the golden alchemy symbols, Merlin being the master of alchemy.
At first glance, this looks perfect. There are 3 or 4 gold alchemy symbols on every page, just as there are 3 or 4 hats on every page. Furthermore, there are 75 alchemy symbols in total, just as there are 75 hats.
This means we have 75 Nimue/Zodiac starting points and 75 Merlin/Alchemy symbols to shoot at. Merlin really is getting a rough time of it!
There are 3 hats on P4 and 3 alchemy symbols. This matches up, so we could draw a line from Z1 (in square S0) to B1, then another line from Z2 to B2 and the third and final line for that page from Z3 to B3.
Turning to P6 there are 4 hats and 4 alchemy symbols, which again matches up. However, the alchemy sequence has jumped to B8. This suggests something is missing. The suspicion is confirmed on P12 which has 4 alchemy symbols, but only 3 hats. We are a hat short.
End of Part 5
This is a major step forward. We now know that we’re shooting lines from the Nimue/Zodiac squares on the border at the Merlin/Alchemy symbols scattered around each page. We also have the start of a numbered sequence in which to shoot these lines
The problem is that the sequence quickly breaks down. The number of hats and alchemy symbols on each page doesn’t always match and the numbers in the alchemy sequence don’t follow on from each other.
The conclusion is that there is still a piece of the puzzle missing. We can guess that this missing piece will fix the Alchemy sequence so that all the short sections follow on one from the other, just as they already do with the Zodiac sequence.
In the line of solids on P4, the Cone and the Cube are both coloured blue, distinguishing them from the other solids. Both solids also link to Merlin. This suggests that the missing piece will be found in the solution to the Cube mini-puzzle.
In Part 6 we will see that this is indeed the case. Your challenge before reading on is to see if you can solve it for yourself. After the Pyramid and Cone puzzles, the Cube puzzle is relatively straightforward to solve, but involves a lot of time-consuming symbol hunting.
Good luck!
Your system is WAY much more clear than the official solution page
(and we certainly did admire your art work, ha!!!)